Krzysztof Mossakowski
For Students
  • The simplest Windows Forms application
    • Create C# empty project
    • Add new item - class
    • Replace generated code with the following:
    •  using System;
       using System.Windows.Forms;
      
       public class HelloWorld : Form 
       {
      	public static void Main() 
      	{
      		Application.Run(new HelloWorld());
      	}
      	
      	public HelloWorld() 
      	{
      		this.Text = "Hello World!";
      	}
       }		
    • Compile and run the project
    • Change output type of the project to 'Windows Application' (Project's Properties / Common Properties / General / Output Type)

  • Creating Windows Forms application using Visual Studio - simple calculator
    • Generate C# Windows Application
    • Investigate code in section 'Windows Form Designer generated code'
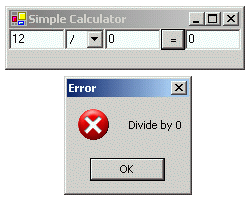
    • Exercise: create simple calculator
    • Hints:
      • Change names of controls
      • Change sizes of controls using a mouse and modifying Size property
      • ComboBox.DropDownStyle
      • Use a double-click on a button to write code
      • Code for pushing '=' button:
         int left = 0, right = 0, result = 0;
         if ( leftTextBox.Text.Length > 0 ) { 
         	left = int.Parse( leftTextBox.Text );
         }
         if ( rightTextBox.Text.Length > 0 ) {
        	right = int.Parse( rightTextBox.Text );
         }
         switch ( operatorComboBox.Text )
         {
        	case "-": result = left - right; break;
        	case "+": result = left + right; break;
        	case "*": result = left * right; break;
        	case "/": 
        		if ( right == 0 ) {					
        			MessageBox.Show( "Divide by 0", "Error", 
        				MessageBoxButtons.OK, MessageBoxIcon.Error );
        		} else { 
        			result = left / right;
        		}
        		break;
         }
         resultTextBox.Text = result.ToString();  
    • Investigate code in section 'Windows Form Designer generated code'
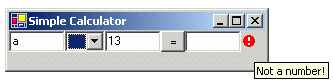
    • Add ErrorProvider control and use it to inform about wrong numbers
    • Hints:
      • Add event handler for Validated event
         string s = (sender as TextBox).Text;
         if ( s.Length > 0 ) {
        	try {
        		int v = int.Parse( s );
        		errorProvider.SetError( resultTextBox, "" );
        	}
        	catch ( Exception ) {
        		errorProvider.SetError( resultTextBox, "Not a number!" );
        	}
         } else {
        	errorProvider.SetError( resultTextBox, "" );
         }  

  • Using Controls - creating image viewer
    • Generate Windows Forms application
    • Add a ListView
      • Set Dock to Left
      • Set Name to filesListView
    • Add a Splitter
    • Add a Panel
      • Set Name to imagePanel
      • Set Dock to Fill
      • Set BackColor to Black
    • Add a StatusBar
      • Set Name to statusBar
      • Try to modify source code in 'Windows Form Designer generated code' section to dock the status bar to bottom edge of whole window
    • Compile and run the project
      • Test changing window's size and position of the splitter
    • Add a MainMenu
      • Create group 'Directory' with options: 'Change', separator, 'Exit'
      • Use '&' to underline a shortcut letter
      • Use '-' to create a separator
      • Change default names of options to more adequate
    • Add a FolderBrowserDialog
    • Add event handler for Directory / Change option
       if ( folderBrowserDialog.ShowDialog() == DialogResult.OK ) {
      	try {
      		filesListView.Items.Clear();
      		DirectoryInfo di = new DirectoryInfo( folderBrowserDialog.SelectedPath );
      		Environment.CurrentDirectory = folderBrowserDialog.SelectedPath;
      		FileInfo []files = di.GetFiles();
      		foreach ( FileInfo file in files ) {
      			filesListView.Items.Add( file.Name );
      		}
      	}
      	catch ( Exception ) {
      	}
       }  
    • Add a ContextMenu
      • Set Name to filesContextMenu
      • Add three items: 'Large Icon', 'List', 'Details'
      • Add event handlers for Click event
         filesListView.View = View.List;
      • Set filesListView.ContextMenu to filesContextMenu
    • Run and test a context menu
    • Add a PictureBox to imagePanel
      • Set Dock to Fill
      • Set Visible to False
      • Set Name to pictureBox
    • Add a Label to imagePanel
      • Set Text to 'Not a image!'
      • Set ForeColor to White
      • Set Dock to Fill
      • Set TextAlign to MiddleCenter
      • Change Font to more visible
      • Set Visible to False
      • Set Name to notImageLabel
    • Modify filesListView
      • Set MultiSelect to False
      • Add event handler for SelectedIndexChanged
         ListView.SelectedListViewItemCollection selected = filesListView.SelectedItems;
         if ( selected.Count == 0 ) {
        	pictureBox.Visible = notImageLabel.Visible = false;
         } else {
        	string file = selected[0].Text;
            try {
        		pictureBox.Image = Image.FromFile( file );
        		pictureBox.Visible = true;
        		notImageLabel.Visible = false;
        	} 
        	catch ( Exception ) {
        		pictureBox.Visible = false;
        		notImageLabel.Visible = true;
        	}
         }  
    • Run and test
    • Add panels to statusBar
      • Add nameStatusBarPanel and sizeStatusBarPanel to Panels collection
      • Set ShowPanels to True
      • Add the following code to filesListView_SelectedIndexChanged()
         nameStatusBarPanel.Text = Environment.CurrentDirectory + '\\' + file;
         sizeStatusBarPanel.Text = string.Format( "{0} x {1}", 
        	pictureBox.Image.Width, pictureBox.Image.Height );  
    • Add scrolling of image
      • Set imagePanel.AutoScroll to True
      • Add the following code to filesListView_SelectedIndexChanged()
         imagePanel.AutoScrollMinSize = new Size(
        	pictureBox.Image.Width, pictureBox.Image.Height );  

  • Drawing and using dialogs
    • Add option Effects / Grayscale to the menu
       if ( pictureBox.Image != null ) {
      	Cursor = Cursors.WaitCursor;
      	Color clr;
      	int v;
      	Bitmap bmp = new Bitmap( pictureBox.Image );
      	for ( int x = 0; x < bmp.Width; x++ ) {
      		for ( int y = 0; y < bmp.Height; y++ ) {
      			clr = bmp.GetPixel( x, y );
      			v = ( clr.R + clr.G + clr.B ) / 3;
      			bmp.SetPixel( x, y, Color.FromArgb( v, v, v ));
      		}
      	}
      	pictureBox.Image = bmp;
      	Cursor = Cursors.Arrow;
       }  
    • Add new form to the project
      • Set name of class to AboutForm
      • Add option Help / About to the menu
         AboutForm about = new AboutForm();
         about.ShowDialog();  
      • Run and test
      • Set StartPosition to CenterParent
      • Set ShowInTaskbar to False
      • Set FormBorderStyle to FixedDialog
      • Set MinimizeBox to False
      • Set MaximizeBox to False
    • Draw in about form
      • Add event handler for Paint
         e.Graphics.FillRectangle( Brushes.White, 0, 0, 
        	ClientRectangle.Width, ClientRectangle.Height );
        
         Font font = new Font( "Verdana", 52, FontStyle.Bold );
         Brush specialBrush = new LinearGradientBrush( ClientRectangle,
        	Color.Yellow, Color.Red, 45, false );
         StringFormat sf = (StringFormat)StringFormat.GenericDefault.Clone();
         sf.Alignment = StringAlignment.Center;
         sf.LineAlignment = StringAlignment.Center;
         e.Graphics.DrawString( "I'm painting!", font, specialBrush,
        	ClientRectangle.Right/2, ClientRectangle.Bottom/2, sf );  
    • Add animation of moving ball to drawing
      • Add member to AboutForm
         const int ballRadius = 50; 
         Point ballCenter = new Point( ballRadius, ballRadius );
         int ballSpeed = 5; 
      • Add a Timer to AboutForm
      • Add event handler for Tick
         ballCenter.X += ballSpeed;
         if ( ballCenter.X < ballRadius ) {
        	ballCenter.X = ballRadius;
        	ballSpeed = Math.Abs( ballSpeed );
         } else if ( ballCenter.X > ClientRectangle.Width - ballRadius ) {
        	ballCenter.X = ClientRectangle.Width - ballRadius;
        	ballSpeed = -Math.Abs( ballSpeed );
         }
         Invalidate();  
      • Add the following code to AboutForm_Paint:
         e.Graphics.FillEllipse( Brushes.Black, 
        	ballCenter.X - ballRadius, ballCenter.Y - ballRadius,
        	2*ballRadius, 2*ballRadius );  
      • Add handler for timer.Tick and call Invalidate()
      • Add handler for AboutForm.Load and call timer.Start()
      • Run and test
    • Prevent flickering
      • Add the following code to form's constructor:
         SetStyle(ControlStyles.DoubleBuffer | ControlStyles.UserPaint | 
        	ControlStyles.AllPaintingInWmPaint, true);
         UpdateStyles();  

  • Using worker thread - make the application responsible during grayscaling
    • Add members to the form
       private Bitmap bmpToGrayscale = null;
       private EventHandler onGrayscaleComplete;  
    • Add methods to the form
       private void OnGrayscaleComplete( object sender, EventArgs e ) {
      	pictureBox.Image = bmpToGrayscale;
      	grayscaleMenuItem.Enabled = true;
       }
      
       private void ThreadProc() {
      	Color clr;
      	int v;
      	for ( int x = 0; x < bmpToGrayscale.Width; x++ ) {
      		for ( int y = 0; y < bmpToGrayscale.Height; y++ ) {
      			clr = bmpToGrayscale.GetPixel( x, y );
      			v = ( clr.R + clr.G + clr.B ) / 3;
      			bmpToGrayscale.SetPixel( x, y, Color.FromArgb( v, v, v ));
      		}
      	}
      	BeginInvoke( onGrayscaleComplete, new object[] { this, EventArgs.Empty } );
       }  
    • Add code to the constructor
       onGrayscaleComplete = new EventHandler( OnGrayscaleComplete );
    • Modify grayscaleMenuItem_Click method
       if ( pictureBox.Image != null ) {
      	bmpToGrayscale = new Bitmap( pictureBox.Image );
      	grayscaleMenuItem.Enabled = false;
      	Thread thread = new Thread( new ThreadStart( ThreadProc ));
      	thread.Start();
       }  
    • Exercise: show progress of the operation on the status bar